
OpenAI Connector
The Teneo GPT Connector allows Teneo Developers to connect to the GPT models and include its functionalities in Teneo solutions. You can choose to use OpenAI API or the OpenAI service on Microsoft Azure.
![]()
In the following, you will find a Teneo solution which contains all required code to get you started.
Prerequisites
You will need an OpenAI account or a Microsoft Azure account to generate your API key.
Option 1: Create OpenAI API account
To use GPT models, first you need to create your OpenAI account. If you are new user, you might obtain some free credit (normally to be consumed in the first 3 months), which should be enough to set up a demo solution.
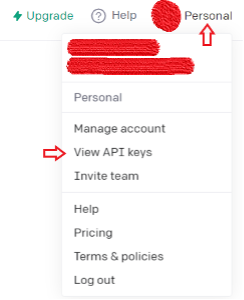
After creating your account, please obtain your secret key by clicking on Personal on top-right and choose View API keys in the drop-down list.
Now click on the + Create new secret key button. You will see the following pop-up window:
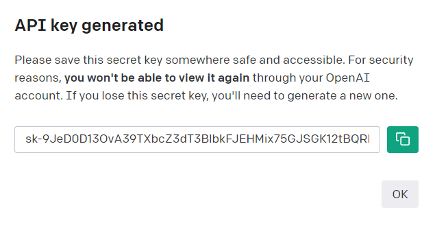
Please copy the API key and save it somewhere else before you click OK to close this window. You will not be able to view the complete key again. If you forget this key, you will have to delete it and create a new one.
Choose your language model
Now you need to choose a language model you need. OpenAI has released the beta version of their GPT-4 model with limited access, while the newest stable version is their GPT-3.5 model which is used in their famous application ChatGPT with a reasonable price at $0.002 per 1k tokens. You can find the API reference here.
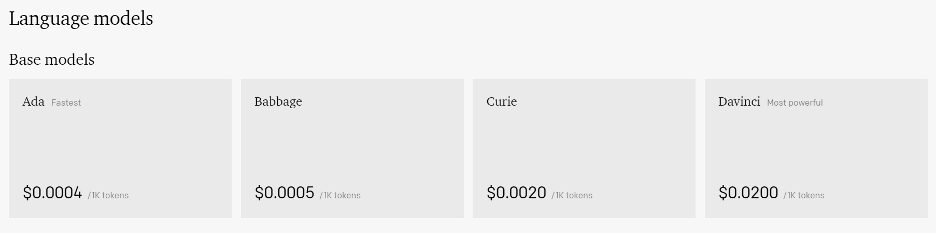
OpenAI also provides you 4 GPT-3 models with different capabilities and prices which are (in the order of least to most capable): Ada, Babbage, Curie and Davinci. More capable model will be more expensive and require more response time, and each model has different versions, for example the current version of the Davinci model is text-davinci-003. You can find all available models here: Models - OpenAI API.
The GPT-3 models also provide fine-tuning options with extra payment required while the GPT-3.5 and GPT-4 models are not fine-tunable. You can find the details of fine-tuning here.
Option 2: Create Azure OpenAI service
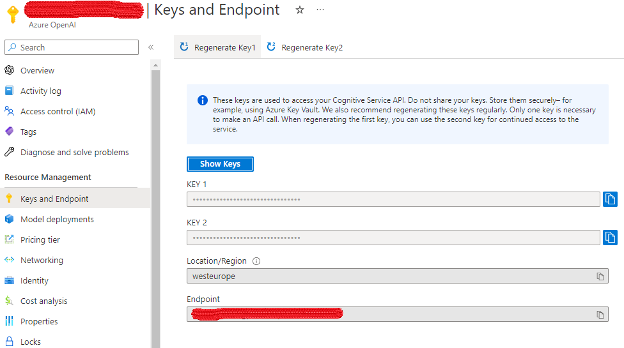
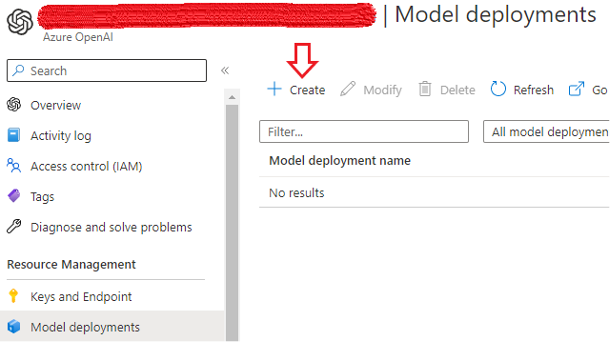
To use GPT models via Microsoft Azure, first you need to apply for the access here, otherwise you will not be allowed to create an OpenAI service on Azure. After creating an OpenAI service, first you need to copy your key and the URL of the endpoint. You will find this information from the Key and Endpoint page under Resource Management. You only need one of the keys to connect to Azure OpenAI service from Teneo.
Now you need to deploy a model by clicking on the Create button from the Model deployments page.
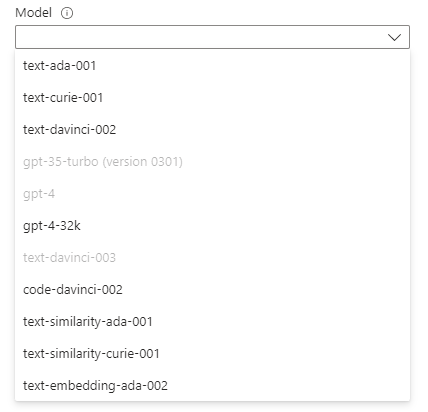
Choose the language model from the drop-down list and give it a deployment name. Your model's deployment name will be used in your Teneo Solution. Please note that the available models here may differ according to the region you select during creating the Azure OpenAI service.
Teneo GPT Connector Solution
The solution contains code in the form of a class GptHelper. You can find the GptHelper.groovy file with the source code in the resource file manager of the solution. This allows you to easily modify or extend the class if needed.
You can edit the class straight from Teneo by selecting the GptHelper.groovy file and clicking 'Open'. See Opening and editing files in an external editor for more details.
Set up the connector
Under Globals -> Variables, you need to configure the variable gptChat with your generated API key and the code of the model you would like to use. This variable creates an instance of the class GptHelper which can chat with the user.

The required arguments are:
- endpoint: If you use OpenAI´s API, the endpoint should be
https://api.openai.com/v1/at this moment. You can check the base URL from here. If you use Azure OpenAI service, you can copy the endpoint URL from the Keys and Endpoint. - apiKey: Your API key, which should be stored by yourself.
- model: The model’s name. If you use OpenAI´s API you should check the model names from here. If you use Azure OpenAI service, you should put your model deployment name (not the model´s name)
- modelVersion: The version of the model. Should be a float number such as 3.0, 3.5 or 4.0.
- background: The background of this chatbot. You can add one or a few sentences to describe the main purpose of your solution.
- optionalParams: A map of parameters other than the model’s name and the input to be sent to the GPT model, such as temperature and top_p. Please click here to find out the full list of the possible parameters. This argument is optional. If you do not add any optional parameters, we will use the default setup suggested by OpenAI for chatting: temperature = 0.9, max tokens = 150 and stop words = “user”, “assistant“.
- connectTimeoutMillis: The maximum response time allowed when connecting to the OpenAI or Azure OpenAI server in milliseconds. This is an optional argument with default value 5000.
- requestTimeoutMillis: The maximum response time allowed when sending a request to the OpenAI or Azure OpenAI server in milliseconds. This is an optional argument with default value 5000.
Besides this variable, there are two more variables gptDialogSummarizer and gptSentimentAnalyzer which correspond to a dialog summarizer and a sentiment analyzer both driven by GPT. You need to configure them in the same way as gptChat and adjust the optional parameters if necessary.
Use the connector
The GPT Connector is easy to use and at the same time very powerful since multi-threading for GPT calls is available out of the box. The following steps explain with detail how to use the included methods.
Basic call
To use the connector, you need to use the following code to create a thread for the text completion task.
gptChat.startCompletion(input, updateDialogHistory)
Then use the following code to extract the result (rename the variable gptOutput if necessary):
gptOutput = gptChat.output().result
The startCompletion method requires two arguments and does not have a return value:
- input: An obligatory String-type argument for the input to be sent to your GPT model.
- updateDialogHistory: An optional Boolean-type argument which indicates if this input-output pair should be saved in the dialog history. True by default. Usually set to true for chat tasks and false for classification/summarization tasks.
Multithreading
It is possible to create multiple threads for different instances of GPT connector. For example, you need to run an intent classifier, a sentiment analyzer and a chat bot all powered by GPT, you can create one thread for each of the tasks and run them simultaneously. This reduces the time for the result retrieval by a lot compared to a sequential call of the individual tasks. In the following, you can see a code example for running the three mentioned tasks:
groovy
1gptChat.startCompletion(input, true)
2gptSentimentAnalyzer.startCompletion(input, false)
3gptIntentClassifier.startCompletion(input, false)
4
5chatOutput = gptChat.output().result
6sentiment = gptSentimentAnalyzer.output().result
7intent= gptIntentClassifier.output().result
8
The multithreading approach can significantly reduce latency if you have several different GPT tasks to run. To take advantage of this approach, you simply need to put the relevant startCompletion methods of different GPT connector instances together into the same script in your Teneo Solution.
Examples of using GPT connector in Teneo solution
Chatting
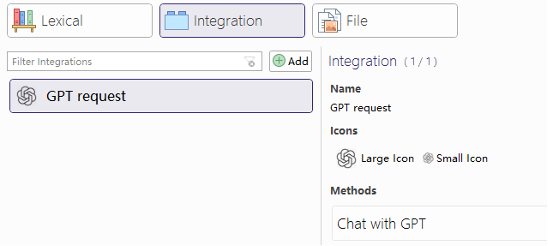
Under Resources -> Integration, you can find the Chat with GPT method which can be used across your Teneo solution. It will send the current input together with the dialogue history to the GPT model, return the answer text, and append the current question-answer pair to the dialogue history.
The flow GPT Greeting message in the example solution shows you an example of building a flow powered by GPT to provide the greeting message, while the flow General Chat Powered by GPT shows you an example of building a flow powered by GPT to cover small talk.
Sentiment analysis
Under Globals -> Listeners you can find a global pre-listener called GPT sentiment analyzer. This listener analyzes the sentiment of each user input and categorize it with “positive”, “neutral” and “negative”. The classification job is taken over by the GPT sentiment analyzer defined by the global variable gptDialogSummarizer. The result will be stored in the global variable gptSentimentDetected which has default value “neutral”.
Dialog summarizing
In Globals -> Scripts -> End dialog, you will find the script node called GPT - Create dialog summary which can summarize the whole dialog after the session has ended using the instance created in the global variable gptDialogSummarizer. The summary will be saved in the global variable gptDialogSummary. This script is not testable in the Try-out panel. You can check the dialog summaries when you have already published your solution and have got some dialog logs, then query for this variable in Optimization -> Log Data by the following TQL query:
TQL
1la s.sv:s:gptDialogSummary
2
Check your usage
Each instance of the GptHelper class tracks the usage it makes to the connected OpenAI GPT service individually in terms of Prompt and Completion Tokens. In Globals -> Scripts -> End dialog, you will find the script node called GPT - Usage tracking, which assigns the Prompt and Completion Tokens used by GPT chat, sentiment analyzer, and dialog summarizer to session variables. The used session variables can be queried in Optimization -> Log Data by TQL queries, for example:
TQL
1la s.id, s.sv:n:gptChatPromptTokens as chatPromptTokens, s.sv:n:gptChatCompletionTokens as chatCompletionTokens
2
The query above can give you a list of all prompt tokens and completion tokens used by GPT chat in each session.
Download
- Download the solution from the following link: GPT Example Solution.
- Import the solution into Teneo. For more details see: How to import solutions.