
Teneo Manager
Introduction
The Teneo Platform application settings, users, groups and permissions are managed in a centralized manner with Teneo Manager. For authentication and authorization, Teneo Manager follows the OAuth2 protocol and can connect to an Active Directory, use a local MariaDB database or can be configured to outsource to an external identity provider (IdP) via SAML which can then provide Multi-Factor Authentication (MFA), etc. as needed. The managed data is exposed to applications via an HTTP REST API which allows to, for example, manage users and groups.
This page describes the Teneo Manager frontend, to learn more about the REST API, please see this section and visit the Manager REST API.
System Requirements
In order to access Teneo Manager, one of the following browsers is required:
- Recent versions of Chrome, Edge and Firefox
- Latest version of Safari (browser and iOS)
Cookies must be enabled in the browser
Login
Logging in to Teneo Manager requires a user account with an Administrator role.
A built-in user account with the administrator role is provided, with a username and password that is specified by the Teneo Manager instalation (more information available in the Installation Guide).
The administrator role may be granted to standard user accounts; see Users further below.
Successful login starts a web session with a 30 minutes timeout. If the session timeout occurs, the user is sent back to the login page.
Teneo Manager Window
Teneo Manager is divided in a top ribbon, a left-side menu and the central space for the management pages. The top ribbon displays the path of the currently open page, the Logout button, the currently logged in user as well as the "i" allowing to open an about box.
The left-side menu, which is collapsible, is divided into groups of related management functions: Commons, OAuth2, Studio and Admin; all of these are described in sections following further below.
The Main page (under Common) is displayed upon login to Teneo Manager; read more about the Main page.

Most of the information available in Teneo Manager is displayed in tables with clickable icons to edit one or more of the properties; clicking an icon opens modal windows where the admin user can view or adjust the needed settings.
The tables are all sortable by one or more columns, the sortable columns are visualized with an arrow icon in the column header; clicking the header selects the column for sorting and changes the order of the date in the displayed table. Tables may also be searchable by certain columns, visualized by a Search text field at the top, right of the table.
Some tables, for example on the Manager Settings page, allow for inline editing in the table by clicking the pencil icon in the right hand side. While a row is in edit mode, a cross to discard changes is displayed and when the value is updated a check mark allows to save the new value.
Common
The Common section in the left-side menu contains the Main (or Start) page and management pages for the data shared between the clients:
- Main
- Users
- Groups
- Log Archives
- Log Data Source (LDS)
Each of these are described in the following sub-sections.
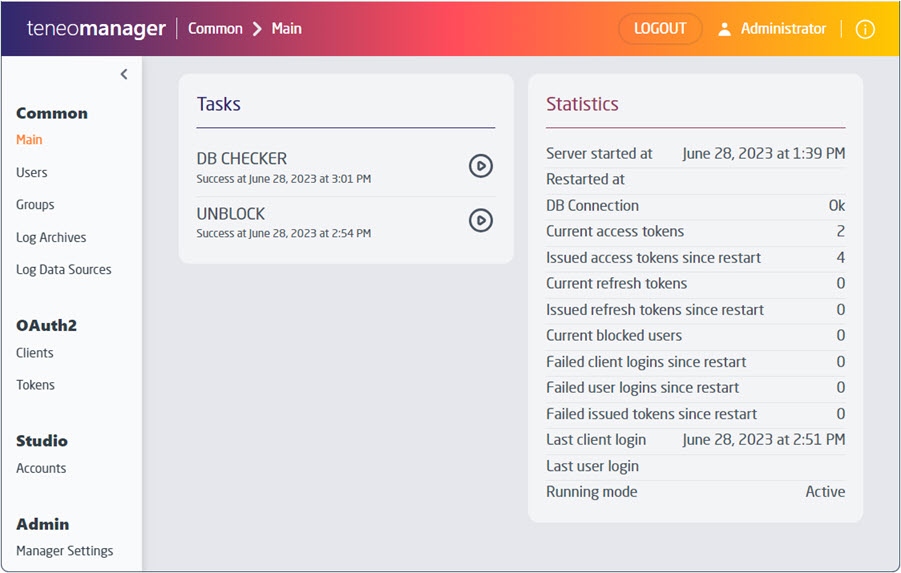
Main page
The Main page is the first page visualized after logging in to Teneo Manager; the page contains a Tasks overview and a Statistics panel.
The Tasks include the following:
- DB Checker: this task checks the health of the DB connection and is executed every minute; click Start to run the task manually. Time and result of the latest task execution are displayed below the name of the task.
- LDAP Checker only visible when Manager runs in LDAP mode: this task checks the health of the LDAP (Active Directory) connection and is executed every minute; click Start to run the task manually. Time and result of the latest execution are displayed below the name of the task.
- Sync only visible when Manager runs in LDAP mode: this task synchronizes the Teneo Manager users and groups' data with the LDAP and is executed every minute; click Start to run the task manually. Time and result of the latest task execution are displayed below the name of the task.
- Unblock: this task unblocks locked users and is executed every 15 minutes; click Start to run the task manually. Time and result of the latest task execution are displayed below the name of the task.
The Statistics panel provide among others information related to server start, the database connection, number of issued access tokens and failed logins.
Users
A user represents a particular user that logs on to a Teneo Platform application; it usually stores the user's Id, password and name. A user item may be backed by an Active Directory entry.
If Teneo Manager runs in LDAP mode, the user data is synchronized from the LDAP every minute. To avoid interference with manual updates in the table, the table is not updated automatically and the page must be reloaded manually to see any changes.
Page Overview
The Users page provides a table with existing users, a button to Create new user, and a text field to search users in the table.
At the bottom of the table, the admin user can select how many rows to display per page and move through the pages of existing users.


The table provides the following information:
- Name: user name
- Logon: user's logon name
- Enabled: user logon is enabled/disabled
- Delegated Login Only visible when Delegated is selected as Authentication type
- Roles: view or edit assigned roles for the selected user; to enable a user for Teneo Manager login, the user must have the Administrator role assigned
- Groups: view or edit assigned groups for the selected user; read more
- LDS Access Roles: view or edit assigned LDS access roles for the selected user; read more
- Accessible Accounts: displays a table of accounts to which the selected user has access, including the assigned permissions
- Reset Password: set a new password for the selected user
- Edit: view or edit the selected user; details include user's Id, user name, user's email, user's logon
- Delete: delete the selected user; a dialogue opens to confirm deletion of the selected user.
When a user is deleted, the user is removed immediately from the local database and all REST interface tokens currently issued for the user are revoked. If Teneo Manager runs in LDAP mode, the user is also deleted from the LDAP.
Create New User
Creating a new user adds the user to the local database; when Teneo Manager runs in LDAP mode, the user is also created in the LDAP.
If the new user is assigned to a group, which again is assigned to a client, then the new user immediately gets access to that client.

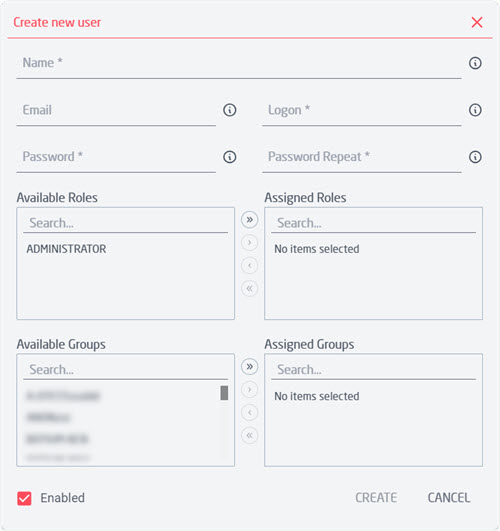
The Create new user button allows to create a new user with the following properties:
- Name: text field for the name of the user; the user name must be unique and match the regular expression defined by the userNameRegex setting (see Manager Settings). If Teneo Manager runs in LDAP mode, the user name restrictions of the LDAP also applies.
- Email: value used only by client applications.
- Logon: the logon name of the user; the logon name must be unique and match the regular expression defined by the userLogonRegex setting (see Manager Settings). If Teneo Manager runs in LDAP mode, the logon name restrictions of the LDAP also applies.
- Password / Password Repeat: the user password, must match the regular expression defined by the userPasswordRegex setting (see Manager Settings). If Teneo Manager runs in LDAP mode, the password restrictions of the LDAP also applies.
- Available Roles: roles which can be assigned to the user; in order to enable a user for Teneo Manager login, the user must have the Administrator role assigned.
- Assigned Roles: roles currently assigned to the user.
- Available Groups: groups to which the user may be added; user access to clients is granted via groups only.
- Assigned Groups: groups to which the user is assigned.
- Enabled: user login is enabled, unselect to disable user login; if Teneo Manager runs in LDAP mode, this flag also enables/disables the user in LDAP.
- Select LDAP Base DN only visible if Teneo Manager runs in LDAP mode: this is the LDAP location of the new user.
Mandatory fields are marked with asterisk.
When all needed values are provided, click Create; Teneo Manager confirms the creation of the new user with a User created successfully! message.
A unique, internal Id of the user (UUID value in hexadecimal format) is automatically generated upon creation of a new user. This Id is viewable by clicking the Edit icon in the table for a specific user.
Groups
A group item usually represents a company. Users are organized in groups; a user can be member of one or more groups. A group may be backed by an Active Directory user entry.
If Teneo Manager runs in LDAP mode, the group data is synchronized from the LDAP every minute. In order to avoid interference with manual updates in the table, the table is not updated automatically.
Page Overview
The Groups page provides a table with existing groups, a button to Create new group, and a text field to search groups in the table.
At the bottom of the table, the admin user can select how many rows to display per page and move through the pages of existing groups.

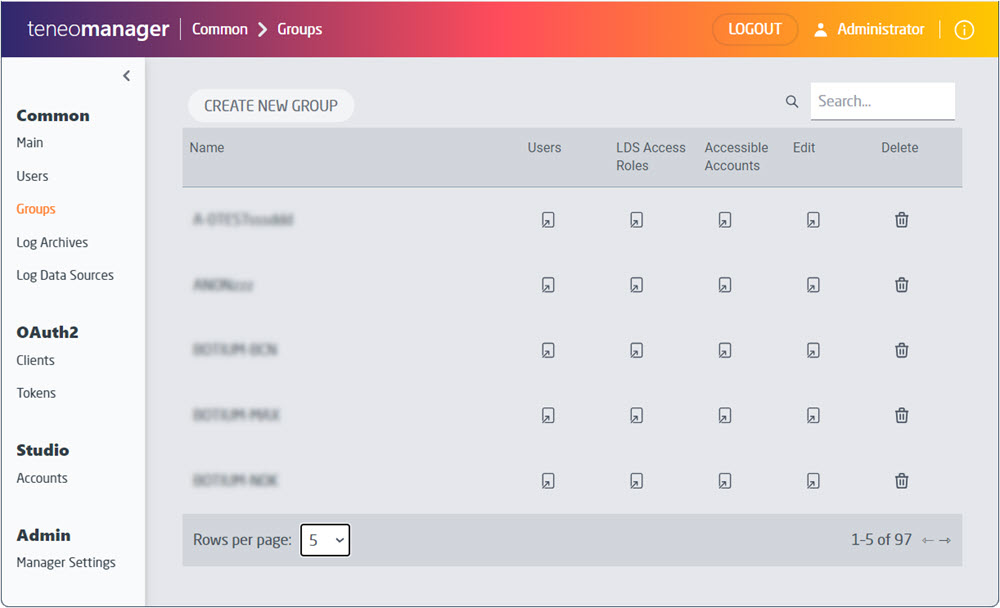
The table provides the following information:
- Name: name of the group
- Users: view or edit users assigned to the selected group
- LDS Access Roles: view or edit assigned LDS access roles for the selected group; read more
- Accessible Accounts: displays a table of the accounts to which the selected group (and its members) has access, including the assigned permissions
- Edit: view or edit the selected group
- Delete: delete the selected group; a dialogue opens to confirm deletion of the selected group.
Upon deletion, the group is removed immediately from the local database; if Teneo Manager runs in LDAP mode, the group is also deleted from the LDAP.
Create New Group
Creating a new group adds the group to the local database; when Teneo Manager runs in LDAP mode, the group is also created in the LDAP.

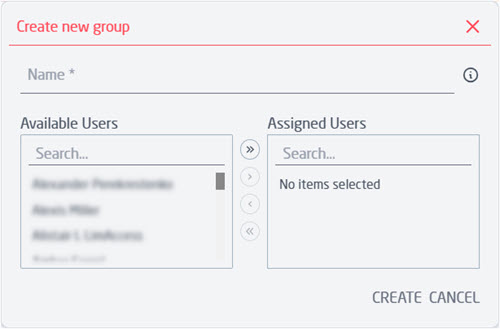
The Create new group button allows to create a new group with the following properties:
- Name: text field for the name of the group; the name must be unique and match the regular expression defined by the groupNameRegex setting (see Manager Settings further below)
- Available Users: users that can be assigned to the new group
- Assigned Users: users assigned to the group; access to clients is granted to all users in the group.
- Select LDAP Base DN only visible when Manager runs in LDAP mode: this is the LDAP location of the new group.
Mandatory fields are marked with asterisk.
When all needed values are provided, click Create; Teneo Manager confirms the creation of the new group with a Group created successfully! message.
A unique, internal Id of the group (UUID value in hexadecimal format) is automatically generated upon creation of a new group. This Id is viewable by clicking the Edit icon in the table for a specific group.
Log Archives
A Log Archive represents a data warehouse entity stored in the Teneo Inquire component. Its main configuration is stored in Teneo Manager and assigned to one and only one Teneo Inquire instance. Its aim is to be an archive for log data and the source for a number of Log Data Sources.
Page Overview
The Log Archives page provides a table with existing log archives, a button to Create new log archive, and a text field to search through the list of existing log archives.
At the bottom of the table, the admin user can select how many rows to display per page and move through the page of existing log archives.


The table provides the following information:
- Id: unique identifier of the log archive using an UUID format, not editable
- Name: name of the log archive
- Client: the Inquire client for which the log archive is created
- Description: description of the log archive, optional field
- Keyspace: auto-generated based on the Id of the log archive, not editable
- Overview: get an overview of the selected log archive
- Import: import log files in the Teneo Log Engine format (.tle or .tle.gz); also see Import
- Edit: view and edit the description or the name of the selected log archive
- Delete: delete the selected log archive; a dialogue opens to confirm deletion of the selected log archive.
Deleting a Log Archive from the table also deletes all access roles assigned to it.
Create New Log Archive
The Create new log archive button allows to create a new log archive.

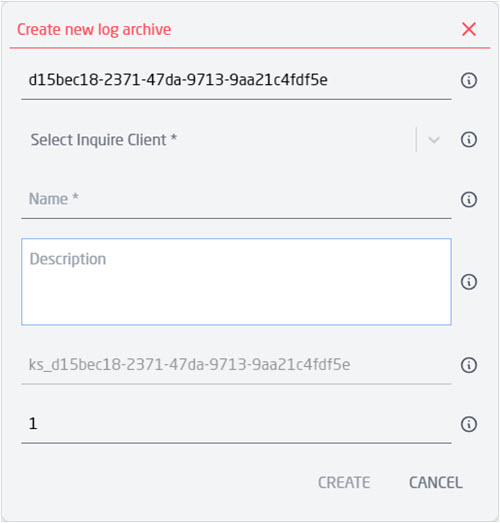
The following properties are available:
- Id: unique identifier of the log archive using an UUID format; the field is set when creating the log archive and cannot be modified afterwards.
- Select Inquire Client: the Inquire client for which the log archive is being created; this is a mandatory field as no log archive can be created without being assigned to a client; the client cannot be reassigned.
- Name: text field for the name of the log archive; the name must be unique within the selected Inquire client.
The name must be 2-60 characters long with characters from any of the following categories: letters (upper or lower case), numbers (0-9), dot (.), and special characters (for example, #@&!%). - Description: optional field to add a brief description of the log archive.
- Keyspace name: this field is automatically generated after the log archive's Id and cannot be modified.
- Replicas: the number of replicas (r), that is, the amount of copies of the log archive that will be generated; r must be lower than the number of nodes - in case it is higher, it will be automatically adjusted.
Mandatory fields are marked with asterisk.
When all needed values are provided, click Create; Teneo Manager confirms the creation of the new log archive with a Log Archive created successfully! message.
Import
To import log files to a log archive, follow the below steps:
Log files must be in the Teneo Log Engine format (.tle or .tle.gz)
- Open the Log Archives page
- In the Import column, click the icon for the log archive where the logs should be imported
- The Import Log Files for ... dialogue opens, now specify the server path in the Server Path field (right side of the view)
- Click Import.
The import begins and the progress is displayed in the view.
Import errors
Sessions which, for any reason, fail to import to a log archive are listed at the bottom of the Import Log File for ... dialogue in the Import Source table.
Click the icon in the Stack Trace column for more information or download the session(s) in the Session column; it is also possible to use the Search field to find specific sessions.
The errors can be removed by clicking Clear All Errors at the bottom of the errors table


Log Data Sources
A Log Data Source (LDS) represents a data source entity stored in the Teneo Inquire application which other components can use to obtain log data. Its main configuration is stored in Teneo Manager and assigned to one and only one Teneo Inquire instance. Several users and/or groups may be granted access to the LDS; if a user is assigned both as an individual and as part of a group, the effective user's role is the aggregation of both.
Page Overview
The Log Data Sources page provides a table with existing LDSs, a button to Create new log data source, and a text field to search through the list of existing Log Data Sources.
At the bottom of the table, the admin user can select how many rows to display per page and move through the page of existing Log Data Sources.

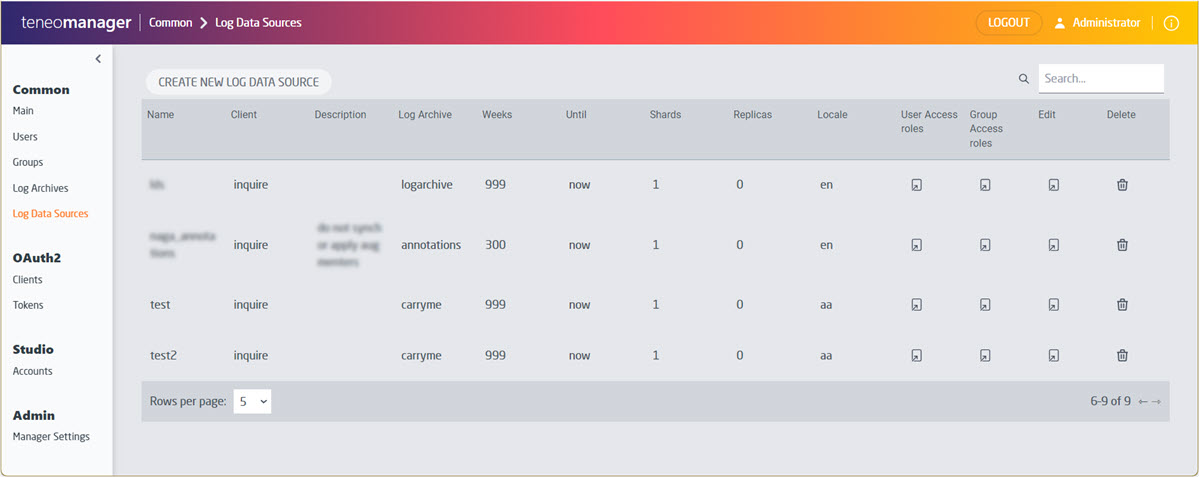
The table provides the following information:
- Name: name of the Log Data Source
- Client: the Inquire client for which the LDS is created
- Description: description of the LDS, optional field
- Log Archive: the Log Archive from which the LDS will be reading the logs
- Weeks: the number of weeks for which data is imported to Elasticsearch
- Until: date up till which data is imported
- Shards: the amount of Elasticsearch shards; see Elasticsearch cluster, shards and replicas
- Replicas: the amount of Elasticsearch replicas; see Elasticsearch cluster, shards and replicas
- Locale: the language (and country) of the LDS, usually the published solution's language
- User Access roles: view and edit user access roles; see LDS Access Roles
- Group Access roles: view and edit group access roles; see LDS Access Roles
- Edit: view and edit the selected LDS, including the Id of the Log Data Source
- Delete: delete the selected LDS; a dialogue opens to confirm deletion of the selected LDS.
Deleting an LDS also deletes all access roles assigned to it.
Create New Log Data Source
The Create new log data source button allows to create a new log archive.


The following properties are available:
- Select Inquire Client: the Inquire client for which the LDS is being created; this is a mandatory field as no LDS can be created without it being assigned to a client.
- Name: text field for the name of the Log Data Source; the name must be unique within the selected Inquire client.
The field cannot contain the following characters \, /, *, ?, ", #, <, >, |, %, :, space nor upper case letters, neither may it start with a dot nor an underscore; the Elasticsearch index name is derived from it and limits the format. - Select Log Archive: the Log Archive from which the LDS will read the logs.
- Description: optional field to add a brief description of the Log Data Source.
- Weeks: indicates the number of weeks for which data should be imported to Elasticsearch (ending at the selected Until setting, see below bullet point)
Default value is 12, but this can be modified at any time (even after LDS creation)
Week numbers use the ISO8601 format (i.e., weeks starts on a Monday)
Weeks are imported as "calendar weeks" in full, even if the week has not yet ended. - Until: date up to which data is imported, in Year-Week format
Default value is Now; meaning the LDS's time span is dynamic (i.e., import is done for the previous 12 weeks until now)
Deselecting Now allows to select a week until which data is imported to Elasticsearch (i.e., the data import is done only up to the selected week and the LDS always contains the same weeks) - Shards: the amount of Elasticsearch shards; see Elasticsearch cluster, shards and replicas
- Replicas: the amount of Elasticsearch replicas, defaults to 1; see Elasticsearch cluster, shards and replicas.
Mandatory fields are marked with asterisk.
When all needed values are provided, click Create; Teneo Manager confirms the creation of the new Log Data Source with a Log Data Source created successfully! message.
A unique, internal Id of the Log Data Source (UUID value in hexadecimal format) is automatically generated upon creation of a new Log Data Source. This Id is viewable by clicking the Edit icon in the table for a specific Log Data Source and client applications may use this value to identify an LDS.
Access Roles
The User Access roles and Group Access roles columns in the Log Data Source table allows to manage the access roles for users and groups respectively when clicking the icon for a selected Log Data Source. The following access roles are available:
- Augmenter: manage augmenters
- Data: manipulate data
- Export: export data sets
- Importer: import log data
- Sysadmin: administrate the system
- TQL: run TQL queries
To add access roles for either a user or group, in the Search for field, start writing the name of the user or group, once selected, check the wanted access role(s) and lastly click Add User/Add Group to add the settings to the table below.
When users and groups are added to the table, Edit and Delete options become available in their respective columns.

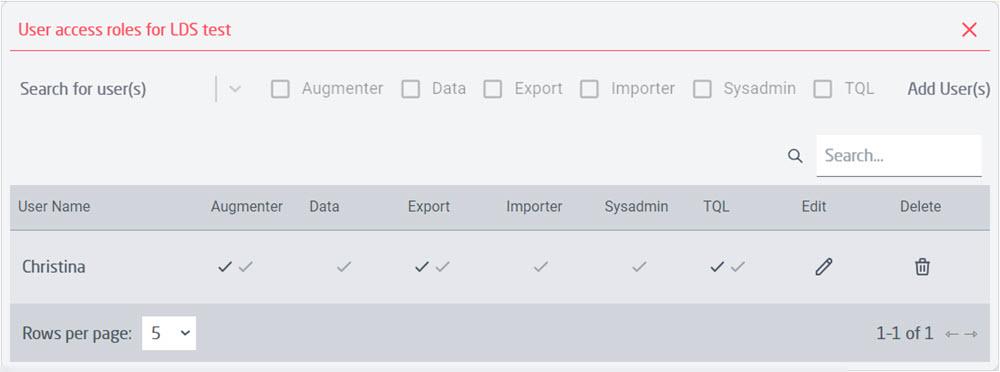
The checkmarks indicates if the role is granted directly to the user (darker grey color) or through a group's permissions (lighter grey color); more details are displayed on hover over.
Also see Log Data Source - User Permissions
Elasticsearch Cluster, Shards And Replicas
Each week of data is divided into shards which are distributed across the cluster. Replicas are duplicated shards distributed across the cluster. Each TQL query will run on 1 CPU core per shard in the Elasticsearch cluster.
Therefore, adding shards lets each TQL query run across more shards in the cluster which in turn increases the performance per query.
Adding replicas means that more than 1 machine can run queries against that shard. In turn, this increases the performance of concurrent queries. Replicas also increase the resilience of the cluster as data is replicated.
Adding more machines or more cores does not automatically increase performance until there are more shards where queries can run on.
Recommended configuration is therefore 2 shards per node in the Elasticsearch cluster with the number of replicas set to
number_of_nodes - 1. If Elasticsearch has not been setup as a cluster then leave the pre-configured defaults.
The following table can be used as a reference:
| Nodes | Shards | Replicas |
|---|---|---|
| 1 | 2 | 0 |
| 3 (recommended) | 6 | 2 |
| 5 | 10 | 4 |
OAuth2
The OAuth2 section in the left-side menu of Teneo Manager contains the Clients and Tokens management pages; both are described further in the following sub-sections.
Clients
A client represents a Teneo Platform application instance; it stores the application's Id, secret and redirect URL.
Page Overview
The Clients page provides a table with existing clients, a button to Create new client, and a text field to search clients in the table.
At the bottom of the table, the admin user can select how many rows to display per page and move through the pages of existing clients.


The table provides the following information:
- Name: name of the client
- Client Type: either Inquire or Studio
- Description: (optional) description of the client
- Client Id: unique identifier of the client using an UUID value in hexadecimal format; the value is fixed and generated by Teneo Manager
The Client Id is used to identify a client for authentication with the REST interface - Client Secret: text string ("password") used for authentication with the REST interface; the value is fixed and generated by Teneo Manager
- Edit: view and edit the selected client
- Maintenance Studio clients only: view information about the last performed hourly and daily maintenance tasks and run the task(s) manually
- Delete: delete the selected client; a dialogue opens to confirm deletion of the selected client
When a client is deleted, the client instance and all its settings are removed immediately from the local database and all the currently issued REST interface tokens for the client are revoked.
TIP: copy the Client Id and Client Secret by simply clicking the value in the column for the selected client
Create New Client
The Create new client button allows to create a new client.

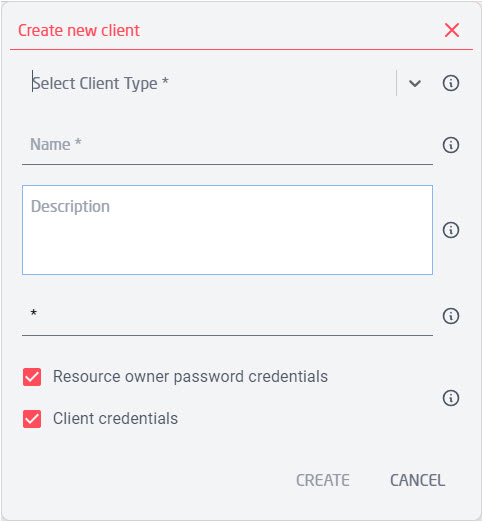
The following properties are available:
- Select Client Type: select between Studio or Inquire; value is fixed as
- Name: text field for the name of the client; the name must be unique
- Description: description of the client, optional field
- Studio URL only visible when client is Studio: the Studio URL
- Inquire Query URL only visible when client is Inquire: the query URL which Inquire clients must use for querying the data
- Inquire Importer URL only visible when client is Inquire: the data management URL which Inquire clients must use for managing the data
- CORS origin: enables the setting of CORS origin headers for the client connection; default value is 'allow all origins' visualized as asterisk (
*) in the view
Note that when updating the CORS origin setting for a component, the component must be restarted to read the new value. - OAuth2 allowed flows OAuth2 authentication flow types enabled for the client:
- Resource owner password credentials
- Client credentials
Mandatory fields are marked with asterisk.
When the Create new client dialogue has been completed, Teneo Manager generates a unique Client Id and the Client Secret (i.e., password) for the new client instance, which is then added to the table.
Tokens
The Tokens page is divided in three tabs which each contain a table with tokens:
- Access Tokens: lists the currently issued access tokens for users and clients.
- API Tokens: the API tokens are essentially persistent access tokens for a particular client additionally linked to a user. The API tokens survive restarts of Teneo Manager as they are stored in the local database, their usage is basically for running scripts where tokens can be provided in script code.
- Refresh Tokens: for user access tokens.
Page Overview
Each tab contains a text field to search through the tokens displayed in the table of the selected tab and, at the bottom of the table in each tab, the admin user can select how many rows to display per page and move through the pages of existing tokens.

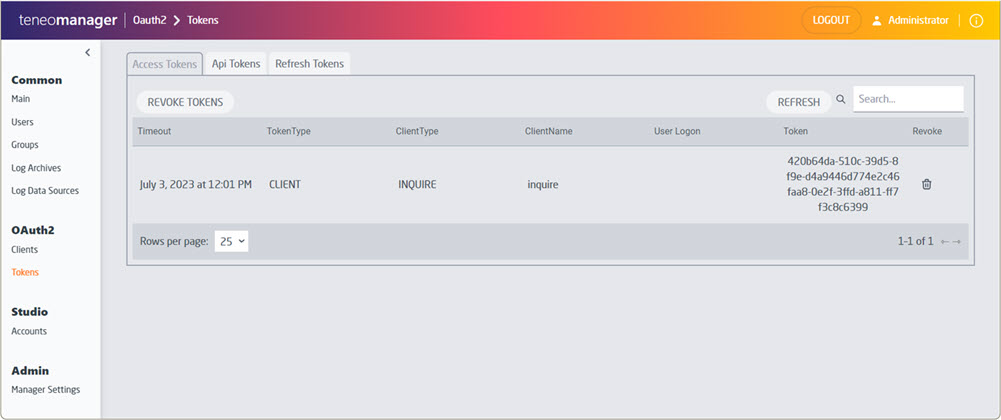
The tabs provides the information specified below for the mentioned tab(s):
| Information label | Available for... | Comment |
|---|---|---|
| Client type | Access Tokens; API Tokens; Refresh Tokens | Value: Inquire or Studio; Access Tokens also includes the value Admin |
| Client name | Access Tokens; API Tokens; Refresh Tokens | Name of the client |
| User Logon | Access Tokens; API Tokens; Refresh Tokens | |
| Timeout | Access Tokens; Refresh Tokens | Date and time of the timeout of the token |
| Token | Access Tokens; Refresh Tokens | |
| Revoke | Access Tokens; Refresh Tokens | Revoke (delete) the selected token; a Revoke Tokens buttons is available at the top of the table to revoke all listed tokens in one go |
| Token type | Access Tokens | Value: Client or User |
| Token (Id) | API Tokens | |
| Name | API Tokens | Name given to the API token |
| Description | API Tokens | Optional description |
| Edit | API Tokens | Edit the selected API token |
| Delete | API Tokens | Delete the selected API token |
The Access Tokens and Refresh Tokens tabs are refreshed automatically every 30 seconds and both tabs provide the following buttons:
- Revoke Tokens: allows to revoke (delete) the tokens; if a filter is applied only the displayed tokens are revoked.
- Refresh: allows to manually refresh the data displayed in the table.
The API Tokens tab allows to create a new API token; see the following section.
Only API tokens can be created through Teneo Manager; Access tokens are created via the API
Create an API Token
The Create an API Token button allows to create a new token with the following properties:
- Name: text field for the name of the API token
- Select Client: select the client for the API token; choose between Inquire and Studio
- Select User: select the user
- Description: description of the API token, optional field.
Mandatory fields are marked with asterisk.
When done, click Create to create the new API token.
Usage Example
Across the Teneo Platform, the way authorization is passed between components is aligned with the OAuth2 Standard (i.e., OAuth2: Bearer Token); below please find an example of the format of the request when calling the Inquire API REST endpoints directly in JavaScript.
The Authorization header value must be Bearer authentication_token_value and, for example, starting a query (assuming the authentication variable contains the result of a successful login call) can be done with the following JavaScript:
javascript
1fetch(`${server}/teneo-inquire-query/rest/tql/submit?index=${encodeURI(lds)}&timeout=1200`, {
2    method: 'post',
3    headers: {
4        "Authorization": `Bearer ${authentication}`,
5        "Content-type": "application/x-www-form-urlencoded"
6    },
7    body: `query=${encodeURIComponent(query)}&index=${encodeURI(lds)}`
8})
9
Studio
This sections contains the management pages for the Teneo Studio application.
Accounts
An account is assigned to one application instance, i.e., Teneo Studio, and contains a certain amount of per-user access permissions to the resources provided by said application. Typically an account is associated with a specific customer.
Though an account stores access permissions per user, access to an account is granted on a group level; that is, in order to grant access to an account for a certain user, a group where said user is a member needs to be connected to the account. Consequently, all members (users) of that group get access to the account.
In the Studio backend, one or more solutions are assigned to an account. Thus, a user who is assigned to a Studio backend account gets access to all solutions assigned to that account.
The Accounts page lists existing accounts, here accounts can be created, modified and deleted.
Page Overview
The Accounts page provides a table with existing accounts, a button to Create new account, and a text field to search accounts listed in the table.
At the bottom of the table, the admin user can select how many rows to display per page and move through the pages of existing accounts.

The table provides the following information:
- Id: unique identifier of the account used by Teneo Studio; the value is a UUID in hexadecimal format
- Name: name of the account
- Client: represents a Teneo Platform application instance
- Enabled: account is enabled/disabled
- Log Archives: Log Archives assigned to the account; users can select one of those when publishing a solution in order to store and archive the logs
- LDS: the Log Data Source(s) assigned to the account which users can later link to a solution and query
- User Permissions: contains a number of permissions which can be enabled/disabled per user for the selected Teneo Studio client
- Group Permissions: contains a number of permissions which can be enabled/disabled per group for the selected Teneo Studio client; permissions enabled at group level are automatically passed down to all the members of the group
- Edit: edit the selected account
- Delete: delete the selected account; a dialogue opens to confirm deletion of the selected account.
Deleting an account firstly removes it from Teneo Manager only; the related account is removed from the Teneo Studio instance after a grace period of 24 hours - and only if it doesn't contain solutions.
Create New Account
The Create new account button allows to create a new account.

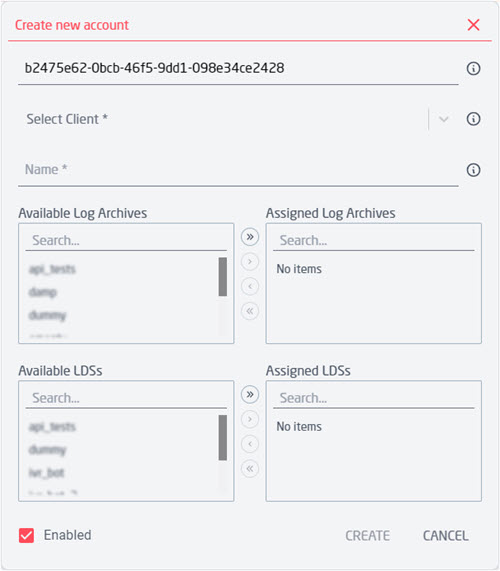
The following properties are available:
- Id: unique identifier of the account used by Teneo Studio (UUID in hexadecimal format); the field is preset with a randomly generated value. In case the account is created for an already existing Teneo Studio client, its Id must be entered
- Select Client
- Name: name of the account; the value must be unique within the Teneo Studio client
- Available Log Archives
- Assigned Log Archives
- Available Log Data Sources
- Assigned Log Data Sources
- Enabled: allows to disable an account (if unchecked) to hide it from Teneo Studio users; a disabled account is not removed from the managed Teneo Studio instance.
Mandatory fields are marked with asterisk.
When all needed values are provided, click Create; Teneo Manager confirms the creation of the new account with an Account created successfully! message.
When the account is created, the related account in the managed Teneo Studio client is available to the user immediately.
User and Group permissions are not assignable in the Create new account view but must be assigned from the Accounts table after creation of the new account
User and Group Permissions
The User Permissions and Group Permissions columns in the Accounts table allow to manage the permissions for users and groups respectively when clicking the icon for a selected account.
User Permissions are a set of permissions that enable/disable certain actions for the Teneo Studio user in the selected account; user permissions can also be inherited from groups the user is member of.
Group Permissions are a set of permissions which are passed on to the group's members and which enable/disable certain actions for the Teneo Studio user(s), i.e., the members of the group, for the selected account.
The following permissions are available (both for users and groups):
- Teneo Admin: create publish environments, import libraries
- Global: edit all solutions
- Exporter: export solutions
- Export IP Setup: export input processors settings of solutions
- Publish To File: publish to war file
- Publish To Production: publish to production
- Modify Publish Environments: modify existing publish environment
- Modify Quality Settings: modify the Quality Control setting related to the publishing workflow
- Modify Account Settings: allows to manage the CLU settings in the Account's tab of Teneo Studio Desktop
- Export as Library: export a solution in library format
- View Libraries: open a document (read-only mode) from an assigned library
- Delete Libraries: delete a library in the Studio account
- Link LDSs: link LDS(s) to a solution
To add permissions to either a user or a group, in the Search for field, start writing the name of the user or group, once selected, check the wanted permission(s) and lastly click Add User/Add Group to add the settings to the table below.
When users and groups are added in the table, Edit and Delete options become available in their respective columns. The checkmarks indicates if the role is granted directly to the user (darker grey color) or through a group's permissions (lighter grey color); more details are displayed on hover over.

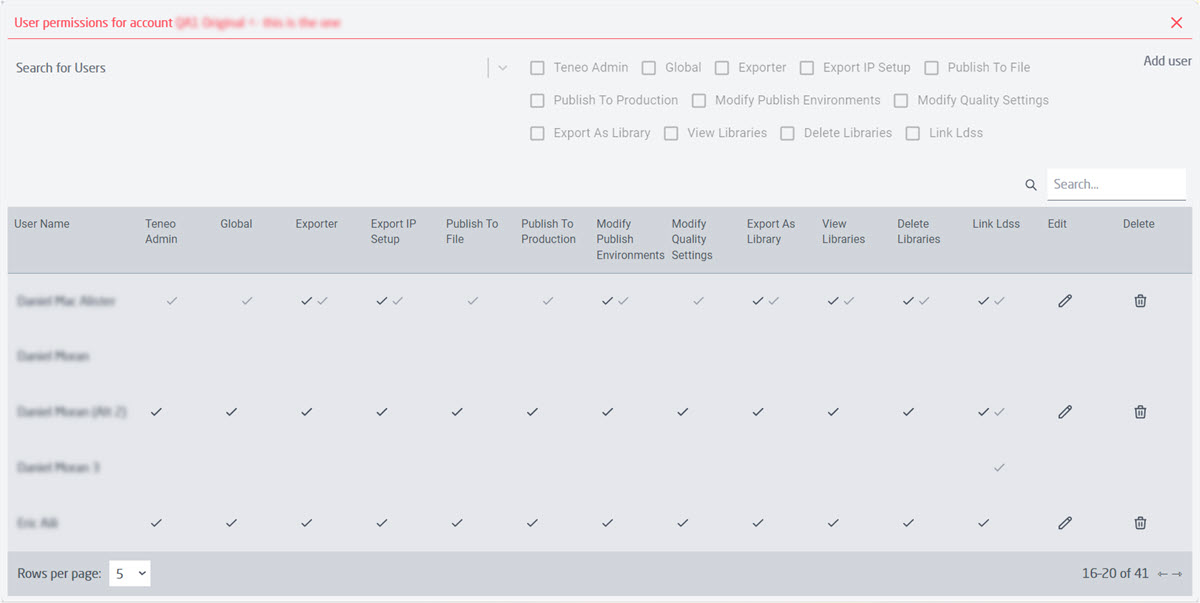
Also see Teneo Studio User Permissions
Admin
Manager Settings
The Manager Settings page displays the settings which control the Teneo Manager instance itself; this does not include the settings provided as Java system properties (see the Installation Guide for details on these properties).
Page Overview
The Manager Settings page provides - up to 3 tabs - General, LDAP and Delegated, depending on the settings for Authentication and Users and Groups source, a Save and Restart button and a text field to search the settings in the displayed table.
At the bottom of the table, the admin user can select how many rows to display per page and move through the pages of settings.

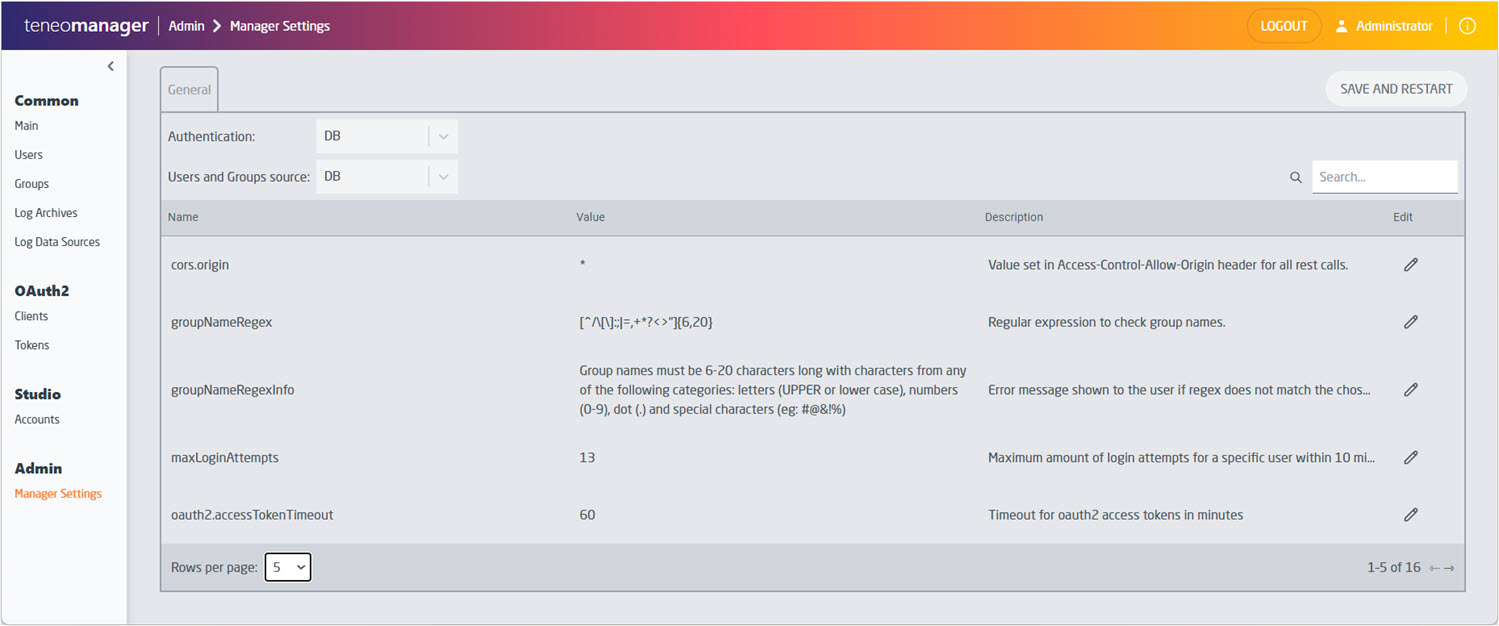
General
The General tab provides the below described options:
- Authentication: authentication type, select between DB, Delegated and LDAP
- Users and Groups source: source of users and groups, select between DB and LDAP
Setting either of the above to Delegated or LDAP opens new tabs with the settings for the selected
The displayed table includes the following settings:
| Setting | Description |
|---|---|
| cors.origin | Value set in Access-Control-Allow-Origin header for all rest calls. Default value is 'allow all origins' (visualized as *). |
| groupNameRegex | Regular expression in Java, defines the validity of a group. If Teneo Manager runs in LDAP mode, the group name must also match the LDAP restrictions. |
| groupNameRegexInfo | Error message shown if the groupNameRegex doesn't match the chosen Group name. |
| maxLoginAttempts | Maximum allowed (failed) login attempts for a user within the unblock period of 15 minutes. If the number of allowed login attempts exceed the limit, the user is prevent from logon (both GUI and REST interface) until the next execution of the user unblock task. |
| oauth2.accessTokenTimeout | Lifespan of the OAuth2 access tokens, provided in minutes. The value must be a positive integer. |
| oauth2.refreshTokenTimeout | Minimum lifespan of OAuth2 refresh tokens, provided in days. The lifespan restarts each time the refresh token is used and the value must be a positive integer. |
| oauth2.stateTimeout | Timeout for the OAuth2 implicit flow state parameter, provided in seconds. The value must be a positive integer. |
| public.url | Defines a public URL to expose the access of the API through this external URL instead of using the internal one. |
| request.retry.count | Number of times the client will try to reconnect to the server when receiving an unauthorized response. |
| request.retry.delay | Time, in milliseconds, between each reconnection try. |
| userLogonRegex | Regular expression in Java that defines the validity of a user's logon name. If Teneo Manager runs in LDAP mode, the logon name must also match the LDAP restrictions. |
| userLogonRegexInfo | Error message shown if userLogonRegex doesn't match the chosen logon name. |
| userNameRegex | Regular expression in Java that defines the validity of a user name. If Teneo Manager runs in LDAP mode, the user name must also match the LDAP restrictions. |
| userNameRegexInfo | Error message shown if userNameRegex doesn't match the chosen user name. |
| userPasswordRegex | Regular expression in Java that defines the validity of a user's password. |
| userPasswordRegexInfo | Error message shown if userPasswordRegex doesn't match the chosen password. |
LDAP
The LDAP tab is only visible if either Authentication or Users and Groups Source is LDAP (see General section above).
LDAP (Lightweight Directory Access Protocol) as supported in Teneo Manager is a user and group source as well as an authentication method; selection of the LDAP for one or the other is done in the Manager Settings page on the General tab and its configuration parameters and test are done in the LDAP tab.
The LDAP tab provide the following options:
- Implementation: implementation type, currently only Active Directory (AD) is supported
- Test button: opens the LDAP Tester dialogue; also see below LDAP Tester section
The displayed table includes the following settings:
| Setting | Description |
|---|---|
| ldap.bindDN | Username to bind a connection to the LDAP; usually in the format domain\logon. |
| ldap.bindPassword | Password to bind a connection to the LDAP. |
| ldap.connectTimeout | Timeout for the LDAP connection, provided in seconds. The value must be a positive integer. |
| ldap.fullManagement | 'true'/'false' to allow/disable creation of users and groups within Teneo Manager. |
| ldap.groupBaseDNs | One or more DNs of LDAP OUs where groups will be retrieved from/created in. The DNs must be separated by semi-colon. Teneo Manager internally adds any sub-OUs of these and displays them on the Groups page. |
| ldap.groupType | Group type when creating a group in the LDAP; the value defines the groupType attribute of the LDAP group item. Must be an integer. |
| ldap.host | Host name of the LDAP server, given in the format ldap://hostname or ldaps://hostname. |
| ldap.maxConnections | Maximum amount of active LDAP connections in the pool; value must be a positive integer. |
| ldap.minConncections | Minimum amount of active LDAP connections in the pool: value must a positive integer. |
| ldap.port | Socket port number of the LDAP server. Usually 389 for LDAP and 636 for LDAPs; the value must be a positive integer. |
| ldap.responseTimeout | Timeout for a response to an LDAP request (used in all requests, including synchronization tasks), provided in seconds. Value must be a positive integer. |
| ldap.syncFrequency | Number of minutes between LDAP synchronizations. |
| ldap.teneoGroupDN | DN of the LDAP group to which all managed users and groups must be member of; it may be empty. |
| ldap.userAccountControl | User Account Control (UAC) to be used when creating users in the LDAP; the value defines the UAC attribute of the LDAP user item. Value must be a positive integer. |
| ldap.userBaseDNs | One or more DNs where users will be retrieved from/created in; the DNs must be separated by semi-colon. Teneo Manager internally adds any sub-OUs of these and display them on the Users page. |
| ldap.userLogonSuffix | Suffix automatically appended to the user logon when creating a user in the LDAP; usually given in the form @domain-name. |
LDAP Tester
The AD Tester, or LDAP Tester is a view which allows users to test and verify if the settings are correct for the LDAP connection.
After clicking Test, the first step is to modify the LDAP settings as desired and then click Fetch Users & Groups to verify the connection to the LDAP. The connection is verified if the correct list of users and groups is returned.
If an error occurs during connecting or no entities are returned, click AD Settings to go back and modify the settings.
If the settings are correct, click Apply Settings to propagate the settings' values to the main window. Click Save and Restart (at the top of the tab) to save and apply the new configuration.
Delegated
Delegated authentication is supported as a user authentication method in Teneo Manager; currently the only supported type is SAML2 (Security Assertion Markup Language 2).
The following is available on the Delegated tab:
- Implementation: implementation type, currently only SAML2 is supported
- Check button: allows to verify that the entered values for Delegated (SAML2) are correct
- IdP Metadata: source of IdP Metadata, select between Settings and URL:
- Settings are read from the settings table which follows, alternatively import IdP metadata settings (XML file) defined in the SAML2 standard using the Import IdP Metadata button
- URL allows to specify a URL where the IdP metadata must be provided and the IdP metadata is then read on every user identification.
- SP Metadata / Export SP Metadata: export SP metadata as an XML file defined in the SAML2 standard; before export creation, the settings are checked for errors.
Below settings are available in the Delegated table:
| Setting | Description |
|---|---|
| contacts.support.email_address | Email address to support |
| contacts.support.given_name | Name of support contact |
| contacts.technical.email_address | Email address to technical team |
| contacts.technical.given_name | Name of technical contact |
| debug | Enables debug mode |
| idp.certfingerprint | An unformatted fingerprint; if provided, then certfingerprint_algorithm is required. Only visible when IdP Metadata is set to Settings. |
| idp.certfingerprint_algorithm | Possible values: sha1, sha256, sha384 and sha512 Only visible when IdP Metadata is set to Settings. |
| idp.entityid | Identifier of the IdP entity (must be URI) Only visible when IdP Metadata is set to Settings. |
| idp.single_logout_service.binding | SAML2 protocol binding to be used when returning the response message; logout functionality not supported. Only visible when IdP Metadata is set to Settings. |
| idp.single_logout_service.response.url | Optional SLO response endpoint info of the IdP; logout functionality not supported. Only visible when IdP Metadata is set to Settings. |
| idp.single_logout_service.url | SLO endpoint info of the IdP. Only visible when IdP Metadata is set to Settings. |
| idp.single_sign_on_service.binding | SAML2 protocol binding to be used when returning the response message. Only visible when IdP Metadata is set to Settings. |
| idp.single_sign_on_service.url | SSO endpoint info of the IdP. Only visible when IdP Metadata is set to Settings. |
| idp.x509cert | Public x509 certificate of the IdP. Only visible when IdP Metadata is set to Settings. |
| login_timeout | Timeout for delegated login in seconds. |
| logon_prefix | Prefix automatically removed from user logon during the delegated login. |
| logon_suffix | Suffix automatically removed from the user logon during the delegated login. |
| security.authnrequest_signed | 'true' or 'false' value indicating if the <samlp:AuthnRequest> message sent by this SP will be signed. |
| security.logoutrequest_signed | 'true' or 'false' value indicating if the <samlp:logoutRequest> message sent by this SP will be signed. |
| security.logoutresponse_signed | 'true' or 'false' value indicating if the <samlp:logoutResponse> message sent by this SP will be signed. |
| security.nameid_encrypted | 'true' or 'false' value indicating if the nameId of the <samlp:logoutRequest> sent by this SP will be encrypted. |
| security.requested_authncontext | If empty, no auth context will be sent in the AuthNRequest. |
| security.requested_authncontextcomparison | Allows the auth comparison parameter to be set. |
| security.sign_metadata | 'true' or empty value indicating if the metadata of this SP requires to be signed. |
| security.signature_algorithm | Algorithm which the toolkit uses on the signing process, options are: http://www.w3.org/2000/09/xmldsig#rsa-sha1 http://www.w3.org/2000/09/xmldsig#dsa-sha1 http://www.w3.org/2001/04/xmldsig-more#rsa-sha256 http://www.w3.org/2001/04/xmldsig-more#rsa-sha384 http://www.w3.org/2001/04/xmldsig-more#rsa-sha512 |
| security.want_assertions_encrypted | 'true' or 'false' value indicating if the assertions received by this SP requires to be encrypted. |
| security.want_assertions_signed | 'true' or 'false' value indicating if the <saml:Assertion> elements received by this SP requires to be signed. |
| security.want_messages_signed | 'true' or 'false' value indicating if the <samlp:Response>, <samlp:LogoutRequest> and <samlp:LogoutResponse> elements received by this SP require to be signed. |
| security.want_nameid_encrypted | 'true' or 'false' value indicating if the NameId received by this SP requires to be encrypted. |
| security.want_xml_validation | 'true' or 'false' value indicating if the SP will validate all received XMLs; in order to validate the XML, 'strict' and want 'XMLValidation' must be true. |
| sp.assertion_consumer_service.binding | SAML2 protocol binding to be used when returning the <Response> message. |
| sp.assertion_consumer_service.url | Specifies info about where and how the <AuthnResponse> message must be returned to the requester; must contain the full endpoint specification (hostname, port and '/teneo-manager/rest/oauth2/delegated/saml2'). |
| sp.entityid | Identifier of the SP entity (must be URI) |
| sp.nameidformat | Specifies constraints on the name identifier to be used to represent the requested subject. |
| sp.privatekey | Private key of the SP (required format PKCS#8). |
| sp.single_logout_service.binding | SAML2 protocol binding to be used when returning the <LogoutResponse> or sending the <LogoutRequest> message; Logout is currently not supported. |
| sp.single_logout_service.url | Specifies info about where and how the <Logout Response> message must be returned to the requester; Logout is currently not supported. |
| sp.x509cert | x509cert of the SP. |
| strict | 'true' or 'false' value indicating if the Java Toolkit will reject messages which do not strictly follow the SAML2, are unsigned or unencrypted messages (when signature or encryption is expected). |
Delegated SAML2
Teneo Manager and therefore the Teneo Platform supports SAML2 SP-Initiated login authentication. Logout is not supported yet, but is is planned to be in future releases.
The easiest way to configure SAML2 is to exchange the SAML2 metadata files between SP (Teneo Manager) and the IdP. They come with all the information needed to setup the connection.
Once the IdP metadata file is acquired, it is just as simple as uploading it using the Import SAML2 IdP metadata button in the Delegated tab. The Metadata settings are then verified and set to the settings table.
Then, once the SP settings have been entered in the settings table, they must be exported using the SP metadata export button and delivered to the IdP admins to setup the connection on their side.
In case the IdP metadata is dynamic, that is, changes on a regular basis, another way of providing it is supported via URL. If the URL option is selected in the IdP metadata dropdown, it will be read on every user login, making this use case fully supported.
Finally, to apply the settings, the administrator must click on Save and restart.
As the delegated login flow requires interacting with backend components from the users browser, some additional configurations should be made at a Platform deployment level for it to properly work (please see the Installation Guide for further instructions). Then, all should be configured and working. To test it, the admin user just need to go to any Platform component and check that the login method is actually delegated and working.
REST API
The Teneo Manager REST API allows for creation of entities through the API; API endpoints and specifications are described in the Manager Server REST API Endpoints - Swagger page. In order to call any endpoint, admin would need to obtain a valid admin access token. Admin access tokens can be obtained using the client credentials OAuth2 flow, applying the admin user as client_id and admin password as client_secret. They share the same expiration time as normal access tokens.