
Getting started
Sometimes your bot will need some additional information from the user before it can provide a final answer. On this page, you will learn how to branch after an output prompt and take different paths depending on the user response. These paths in Teneo are known as transitions and are used to tie flow nodes together.
We'll use the following example, where the bot provides information about the coffee mug to the user, and then the bot needs a confirmation from the user before it proceeds to reserve a coffee mug:
User: I want to buy a coffee mug.
Bot: The official Longberry Baristas coffee mug is only available for purchase in our store. Would you like me to reserve a mug for you?User: Yes.
Bot: I have reserved a Longberry Baristas coffee mug for you.
or
User: I want to buy a coffee mug.
Bot: The official Longberry Baristas coffee mug is only available for purchase in our store. Would you like me to reserve a mug for you?User: No.
Bot: Ok, I will not reserve a coffee mug for you.
To achieve this we will do the following:
- Create a new flow.
- Populate a trigger with example inputs and generate a Match.
- Add an output response in the form of a question.
- Create a 'yes' transition if the user replies with 'yes'.
- Add output response for the 'yes' scenario.
- Create a 'no' transition if the user replies with 'no', and then add answer text for the 'no' scenario.
- Save and test the flow.
This is what our flow will look like when it is completed:
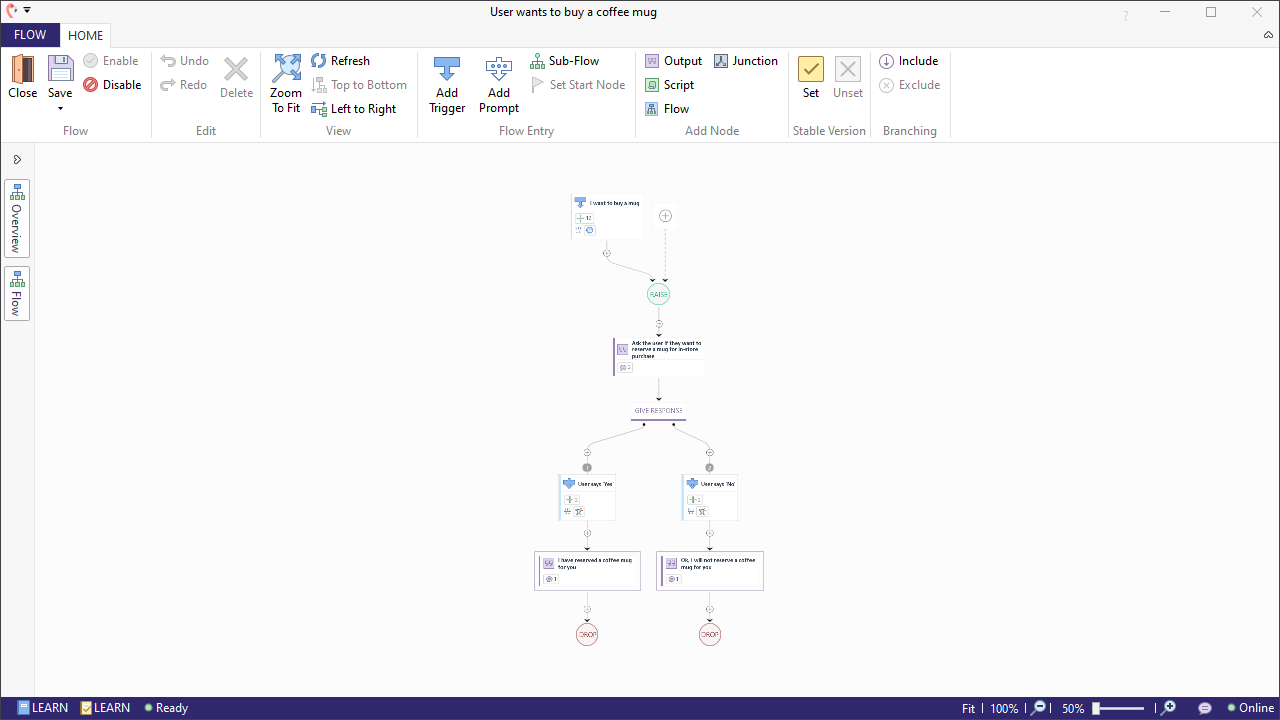
This page will only cover the communication with the user. To actually reserve a coffee mug, we would have to integrate with a service; we will leave that part out for now.
Create the basic flow and populate the trigger
The first steps are to create a new flow and populate the trigger with relevant training examples. Start by doing the following:
- Select the 'Flows' folder and create a new flow by pressing the 'Flow' button.
- Once the flow has been created a new window will open; enter the flow name
User wants to buy a coffee muginto the name field. - Press the back button in the top left corner and select the trigger to open the trigger configuration panel.
- Give the trigger the name
I want to buy a mug - Add the positive learning intents below either one by one, or paste them all at once by clicking where it says, 'No Positive Intents' and use the shortcut Ctrl+V (alternatively, you can also right-click and choose Paste).
example-inputs
1Do you have branded mugs for sale?
2Can I buy a mug please?
3Do you sell mugs?
4Can I purchase a mug?
5Purchase coffee mug
6I want to buy a mug
7Do you have coffee mugs for sale?
8I would like to purchase a coffee mug
9I want to buy your coffee mug
10Do you sell longberry barista mugs?
11I want to have a longberry barista branded mug
12I want to buy a mug!
13- Now we need to add a Match. Click on the 'Generate' button under 'Match' section, this will automatically generate the best Match requirement based on the User Intents.
Add answer texts to the output
Now we will populate the output node with answer texts. In this case, the output node will be used to give the user information about the Longberry Barista coffee mug and then ask a question, rather than just give a definitive answer.
- Select the output node to open the output configuration panel.
- Add an output name and enter a name like
Ask the user if they want to reserve a mug for in-store purchase. - Add the following answers to the output node (use the Add button to add the individual answers):
The official Longberry Baristas coffee mug is only available for purchase in our store. Would you like me to reserve a mug for you?Right now you can only buy our coffee mug physically in our store. Do you want me to reserve one for you?Our coffee mug is only available for purchase in our store. Shall I reserve one for you?
Output nodes can contain multiple answer variations to make the conversation more dynamic. Teneo allows you to either randomly choose an answer and return it to the user, or to set order for the outputs to be returned.
Add two transitions
We have now reached the point in the flow where we expect the user is going to say either 'yes' or 'no'. Depending on what is said, the bot should react differently. Let us start with adding these transition.
- Located under the output node 'Ask the user if they want to reserve a mug for in-store purchase', click on the Plus icon, followed up with 'Fork To' and 'Multiple complete transactions'. You will now have the option to select the number of times the output should be forked.
- Enter '2' and click on confirm. Notice that two new paths are shown for the user to take. These will now be edited to cover the 'yes' and 'no' options.
So far, you have created two flows in your solution, each containing one trigger with a Class Match. But in the next section, you will get to add a Language Object-based Match to a transition.
Add a Language Object Match
Now we need to make sure that one of the paths only matches (the line that connects two output nodes) when the user says ‘yes’. To achieve this, we need to add a new type of Match requirement, namely a language condition. Simply put, language conditions check if a user input matches a certain pattern. They can be generated from a set of examples or you can specify them directly. Let's generate one from a set of example inputs.
- Open the transition configuration panel by selecting the transition labelled '1'.
- Give the transition the name
User says 'Yes'. This increases the readability of the flow and makes debugging easier. - In the examples panel, paste the following examples:
example-inputs
1Yes
2Indeed
3Yep
4- Finally, click on the 'Generate' button under 'Match' section, this will automatically generate the best Match requirement based on the example specification.
After a few seconds, the match requirement field will get the value (%YES.PHR). This is the 'Match' for 'Language Objects' that was generated. The language condition uses a 'language object' called YES.PHR, which recognizes various phrases (hence the suffix .PHR) that mean 'yes', like 'by all means', 'absolutely' and 'yup'. This perfectly covers our need for this transition. Note that there is a lot more you can do with language conditions, but that will be covered later.
The condition used as a Match in this example is based on the User Intents, and unlike class, there is no ‘condition manager’. This means that all conditions are managed on the node or transition itself.
So far, we have only added one Match per trigger and transition. We have only explored two different types of Matches, Class, and Language Objects. However, triggers and transitions can contain one or more match requirements. It is also possible to mix the Match requirement types depending on what the use-case requires, this is however not going to be covered on this page. You can read more about it here.
Add an answer text
The last step to complete the 'yes' branch is to specify how your bot should respond when the user says 'yes'. The output node below the 'User says Yes' should be selected:
- Give the output a descriptive name like:
I have reserved a coffee mug for you. - Finally, add the answer text:
I have reserved a Longberry Baristas coffee mug for you.
Create the path for the user saying 'no'
Now, we will specify what should happen when the user says 'no'. We'll follow the same steps as when adding the first branch:
- Select the transition labelled '2'.
- Give the transition the name
User says 'No'. - Add a few example inputs in the examples panel:
example-inputs
1No
2Never
3Nope
4- Finally, click on the 'Generate' button under 'Match' section, this will automatically generate the best Match requirement based on the example specification.
Add an answer text for 'no'
Almost there! Now we need to make sure that the reply is recognized and taken care by the flow.
- Select the Output node below the transition.
- Give it the name:
Ok, I will not reserve a coffee mug for you. - We can reuse the name of the output node as our answer text.
Finally, save your flow by clicking 'Save' in the top left or use the shortcut Ctrl+S.
Try it out!
That's it! If you would like to test the flow from within Studio, minimize or close the flow, if the 'Tryout' window is not open, you can reopen it panel in the 'Solutions' window and have a go.
Summary
You've just created your first interactive flow and used the following components:
- Match, which are used to set criteria that the user's input must match.
- Multiple answer variation, used to make the bot's responses more dynamic.
- Language condition, which you can use to ensure that the user input matches a certain pattern.
- Transitions, which determine the path your dialogue should take.
Test yourself
Try to add one more branch, but this time for if the user answers with an answer that does not meet the match requirements of the Yes or No transitions. Make sure to test your flow in Tryout!