Getting started
Sometimes it's not enough to recognize which flow to trigger. Your bot may also need to extract some piece of information from the input to respond appropriately.
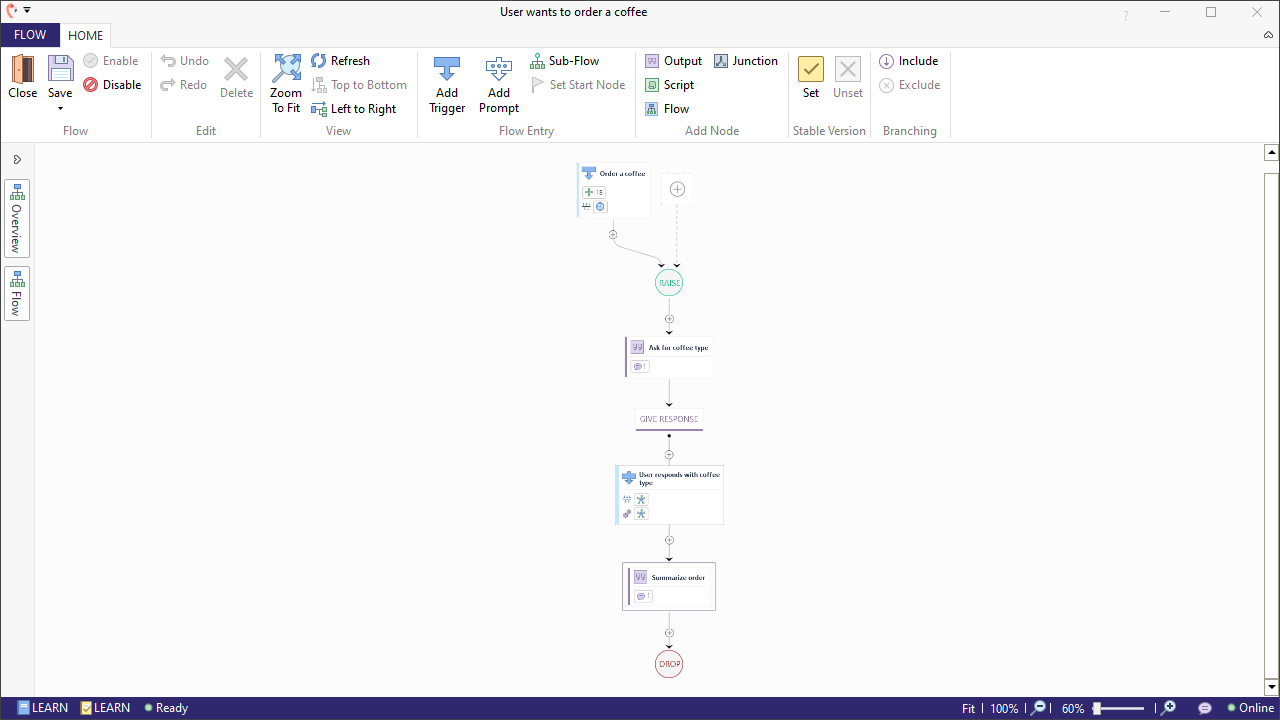
A typical use case is, picking up the user's order and repeating it, like in this example:
User: I'd like to order a coffee.
Bot: Ok, what coffee would you like?User: A espresso, please.
Bot: Ok, a espresso will be ready for pickup in 5 minutes.
In the following, we will show you how to create a flow that enables users to have this kind of conversation with your bot. This approach will make use of the entity we created earlier. These are the steps involved:
- Add a new flow.
- Set up a flow variable.
- Add another output node.
- Configure an After Match to extract information.
- Use the information in the output.

Create a new flow
We begin by creating a new flow. Just as previous flows we have built, it will have a trigger and an output node.
- Create a new flow and call it
User wants to order a coffee.
Populate the trigger
- Name the trigger
Order a Coffee.
Now it is time to populate the trigger:
- Copy the following learning examples to your clipboard:
example-inputs
1A small filter coffee, please
2Can I get a coffee?
3Can I have a coffee, please?
4Can I order a coffee
5Can I order an espresso?
6Can you get me a coffee
7Could I get a large macchiato?
8Could I have a flat white
9Could I order a large americano
10Give me a Frappuccino, please
11I want a small cappuccino!
12I want espresso
13I want to order a coffee
14I would like a coffee
15I would like to order a coffee
16I'd like a large espresso
17I'd like to order an americano
18May I have a filter coffee?
19- Select the trigger, go to the 'Examples' panel on the right, and click where it says 'No Positive Examples'. Then hit Ctrl + V to paste the learning examples. You can see that it worked when the examples appear in the field. Have a look at the video below if you are unsure how to import all examples at once.
- Scroll down to the Match section and select the 'Generate' button, this will automatically generate a class trigger.
- Your trigger is now configured.
Populate the output node
In the output node, we want to prompt the user to indicate the desired coffee type in more detail:
- Select the output node.
- Name the node
Ask for coffee type. - Go to the 'Answer' panel and paste the following:
Ok, what coffee would you like?.
Extract information from the user input
So far so good. You now have a flow that triggers when users want to order a coffee and it answers with a question about the coffee type. To be able to pick up the coffee type from the user input, we now need to proceed with the following:
- Set up a flow variable to store the coffee type.
- Add an additional output node that will summarize the order including the coffee type.
- Extract the coffee type on the transition between the two output nodes using an After Match.
Create a flow variable
The flow variable we create here will later hold the coffee type that the user has mentioned:
- In the flow's main window, move to the 'FLOW' tab, and select 'Variables'.
- Add a variable and name it
orderedCoffeeType. - Put
""in the 'Evaluation Script' field. This initializes the variable with the empty string.
Add an additional output node
The transition between the two output nodes should only be traversed if the user mentions a coffee type. To ensure that, we need to:
- Click on the Plus icon below the output node, followed up with 'Continue With' and 'Transaction'.
- Name the transition
User responds with coffee type. - With the transition selected, go to the Match section and click 'Add' and then 'Entity' from the drop-down menu.
- Enter
COFFEES_SERVEDin the Entity field. This means that Teneo will only continue when the user mentions something which matches the entity.
Extract information from the entity
We will store the coffee type that the user has mentioned in the flow variable orderedCoffeeType, and we will do so using an After Match:
- Make sure the
User responds with coffee typetransition is still selected. - In the configuration panel, go to the After Match section, click 'Add', and select 'COFFEES_SERVED' under 'Entity'.
- Now click into the 'Entity' field, which will make the 'Add Mapping' button clickable. Click the 'Add Mapping' button.
- The first field is the 'Source' field. This denotes the value of the NLU variable of the entity 'COFFEES_SERVED' that we want to store. Select
coffeeTypefrom the dropdown menu. - The second field is the 'Target' field. This denotes the name of the variable where the extracted value is to be stored. Select
orderedCoffeeTypefrom the dropdown menu.
Configure the output
Finally, now it's time to edit the output node which will hold the summary of the user's order. Note that we add the newly created variable orderedCoffeeType First we have to:
- Select the output below the transition.
- Name this output node
Summarize order. - Select the 'Answer' field of the new output node and paste
Ok, a ${orderedCoffeeType} will be ready for pickup in 5 minutes.. - Save the flow and you're done!
Test the scenarios
Now it's time to test the flow!
User: I'd like to order a coffee.
Bot: Ok, what coffee would you like?User: A cappuccino, please.
Bot: Ok, a cappuccino will be ready for pickup in 5 minutes.
Test yourself
If you have done the previous test yourself there should be a working entity for Coffee Sizes. Add that entity here and don't forget to try it in Tryout.